Bridal Showers and Wedding Inspiration
DIY & Crafts
DIY Thanksgiving and Fall Crafts
Thanksgiving
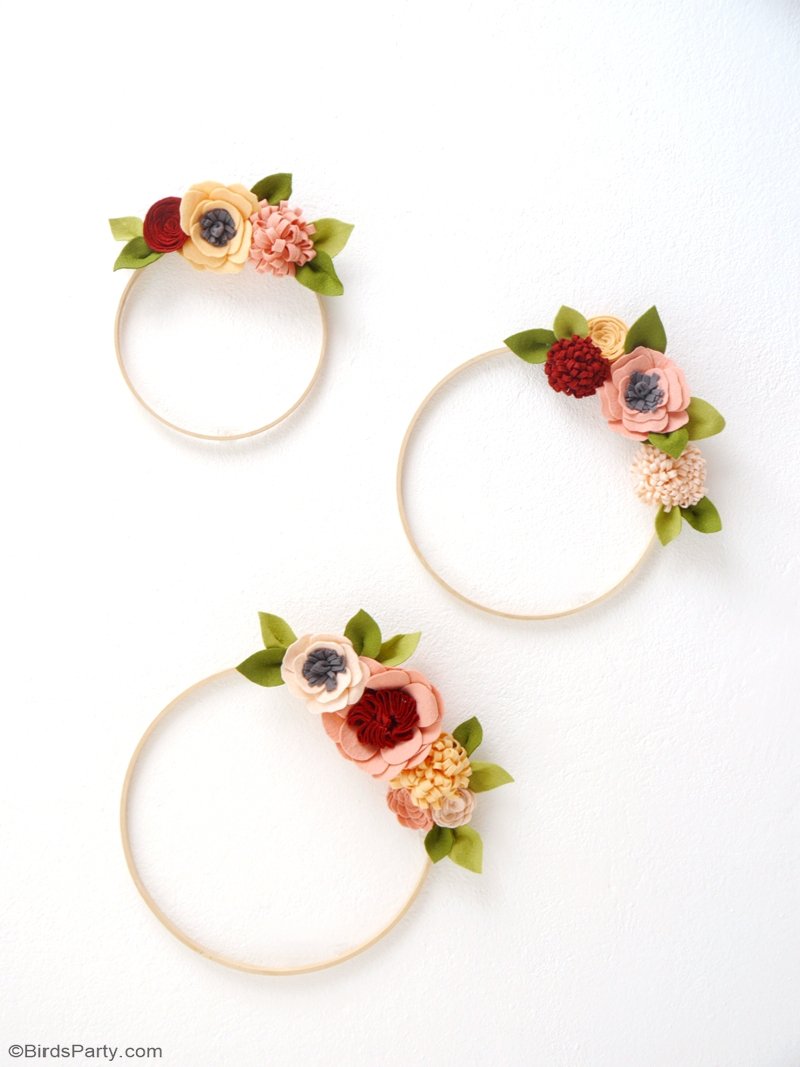
DIY Felt Flower Wreath for Fall
Admittedly, I don't decorate much for fall. Being a blogger, come September, my mind is already thinking to Christmas (crazy, I know), so fall decor per se consists of a few autumn-scented candles dotted around the house. That's it!
This year though, I wanted to up my fall decor game with a pretty wreath or two, which are also perfect for decorating any space in the home for Thanksgiving!
Wreaths can immediately set the mood when you walk through the door, and it's an easy decor piece I can change each season without much effort.
Plus, these felt floral wreaths look great displayed all year 'round, don't you think?
Plus, these felt floral wreaths look great displayed all year 'round, don't you think?
But, I also wanted my fall wreath to be everlasting. And easy to make. Basically, I wanted a seasonal wreath that I can just take out of storage year after year, to help inject a little autumnal flair to my home or party scene. Not much to ask for, right?!
So I decided upon a felt flower wreath. I love working with felt, and know it's an easy and inexpensive craft too. Oh, and did I mention this a no-sew craft? Bonus point, right? 😉
For this felt flower wreath I chose felt colors that say" fall" to me: Bordeaux (wine color), light peach, cream, "custard", gray for the anemone centers and dark and light moss green for the flower leaves. But it would be equally pretty made with pastel colors for spring or summer!
I can see these floral wreaths decorating a wall behind a Thanksgiving desserts table, or autumnal drinks station (like I styled here), but they also make great wall accents for the home or front door.
Not to mention that they'd be super pretty decorations for wedding venues or bridal showers, and so so many other parties and celebrations!
Plus, once you master the art of felt-flower-making, you can use the flowers to adorn pretty much anything - from headbands to cushions or even cake toppers!
I made four types of felt flowers for my wreath: roses, cabbage rose, anemones and chrysanthemums that I then stuck to embroidery hoops.
In the end, I made too many flowers for the large size hoop I had, so I decided to split the flowers among three wreaths instead, and use three hoops for a pretty wall gallery of floral wreaths.
DIY Felt Flower Wreath for Fall
Materials:
* felt: Bordeaux (wine color), light peach, cream, "custard", gray, dark and light moss green
* scissors
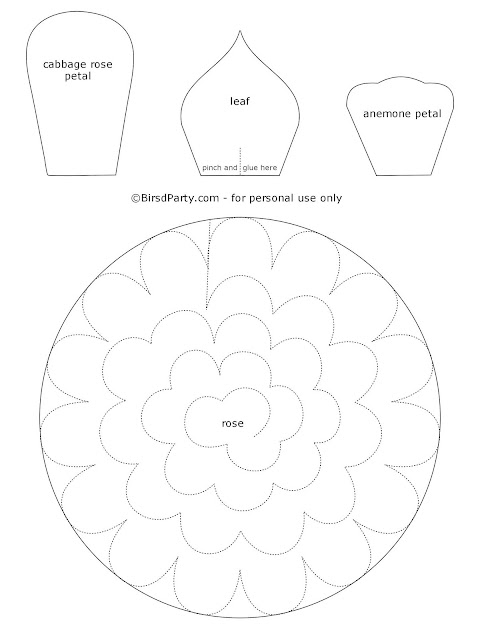
* petal and leaves templates (right click template image below, save to your computer and print on A4 size)
* hot glue gun
* embroidery hoops (I used 30, 20 and 15 cm diameter hoops)
Directions:
1) Make the felt flowers as directed below. The quantity is up to you, but for three wreaths I made 12 flowers (1 cabbage rose, 3 anemones, 4 roses and 4 chrysanthemums). Cut leaves using the template out of dark and light green felt, then pinch and hot glue the bottom ends together to give them a more 3D shape.
2) Hot glue the shaped leaves to the back of each flower head.
3) Arrange the flowers onto the hoop to your liking, then hot glue them in place.
4) Use more felt leaves to hide the glue on the back of the hoop. Add other flowers and more leaves to your liking. There's no exact science here, simply arrange flowers and leaves and stand back to see how you like the result. Once you're happy, hot glue them in place.
DIY Felt Cabbage Rose
Directions:
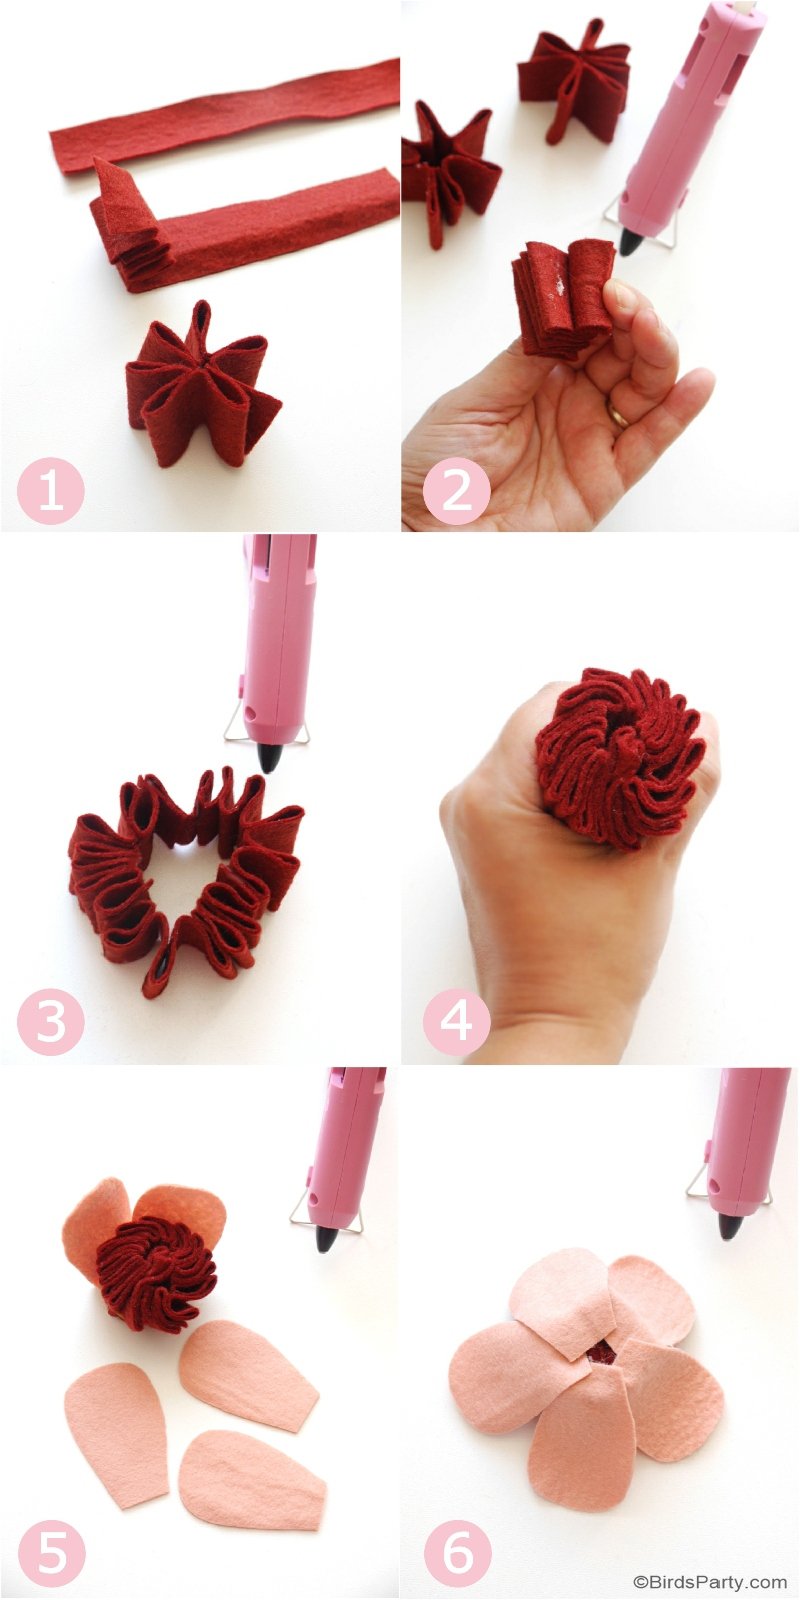
1) Cut three long strips of same length (about 1 inch or 2 cm thick) out of Bordeaux colored felt, and fold them in an accordion fashion.
2) Add a dot of hot glue to each fold on one side only.
3) Now hot glue the three strips end to end to form an accordion circle.
4) Pinch the circle together and arrange the fold to follow only one direction. This is your rose center.
5) Holding the circle tightly, hot glue petals made from light peach felt. Overlap the petals, hot gluing them from the bottom of the rose center, until your happy with the fullness of the "bloom". I used about 12 petals for mine, but you can add more or less petals.
DIY Felt Anemones
Directions:
1) Cut a small rectangle (about 1 x 4 inch or 2 x 15 cm) of gray felt. Snip along one side. Cut a small rectangle for the anemone center. Fold the rectangle on itself and hot glue in place. Cut petals out of a light-colored felt of your choice.
2) Place the anemone center onto the snipped rectangle and roll and hot glue in, place to make the "stamen".
3) Hot glue the petals to the gray flower stamen.
4) Overlap the petals until you reach the desired fullness for your bloom (I used 8-12 petals)
DIY Felt Roses
Directions:
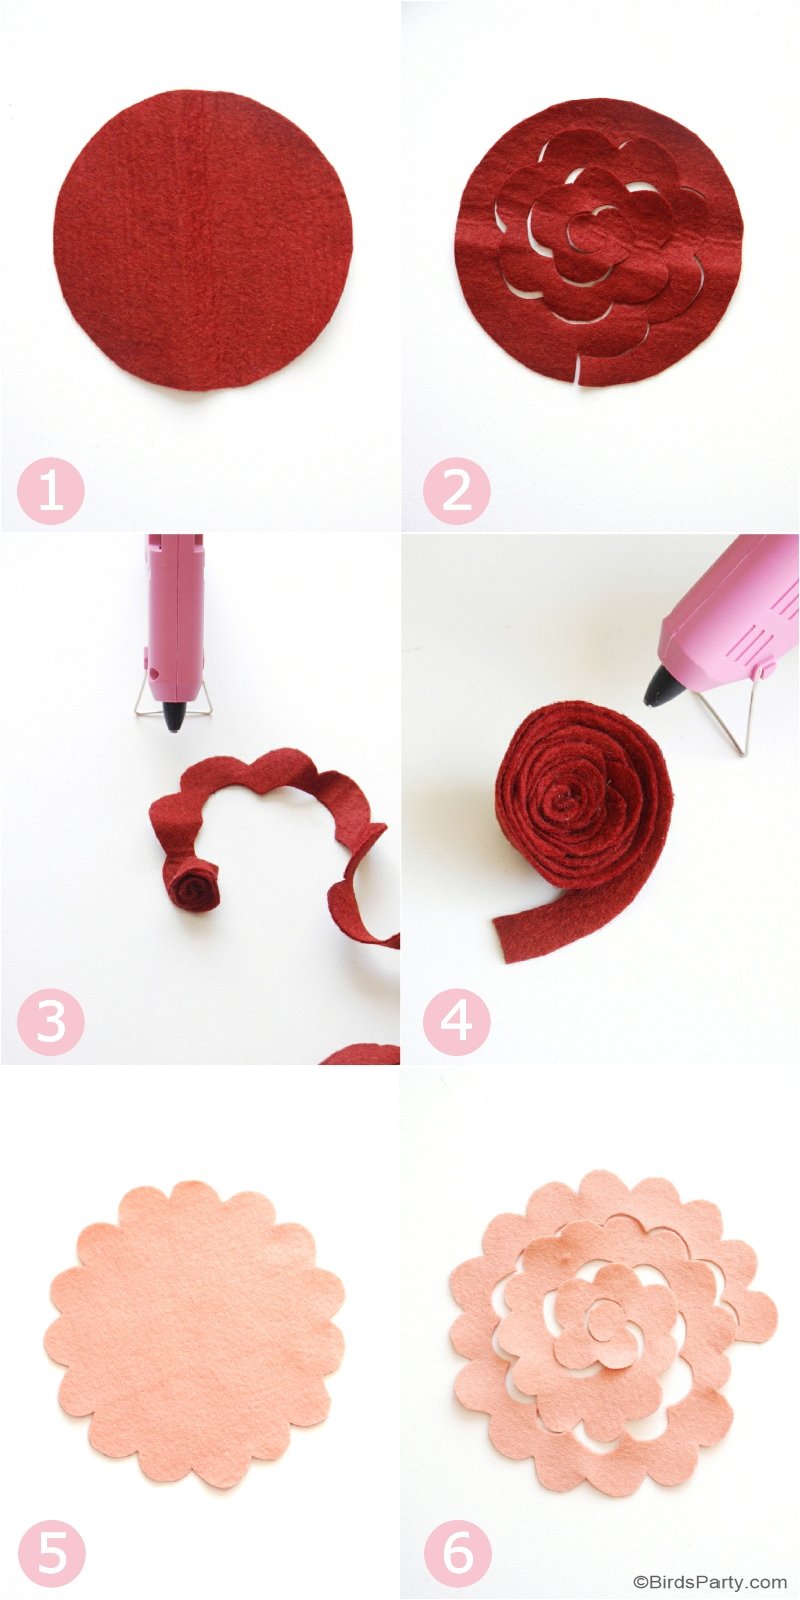
1) Cut a circle of felt about 6 inch or 15 cm in diameter.
2) Draw a scallop pattern all the way to the center of the circle as shown (freehand is fine) and cut the felt.
3) Start rolling the felt from the center, hot gluing as you roll to secure it in place.
4) Finish with a dot of hot glue.
5) For another type of rose with scalloped outer petals, cut a scalloped circle out of felt.
6) Repeat steps above to form your scalloped edge rose.
DIY Felt Chrysanthemums
Directions:
1) Cut a strip of felt about 2 inch or 5 cm wide. Fold it in half length-ways.
2) Snip all along the folded edge of the felt , leaving about 1/2 inch or 1.5 cm uncut on the base.
3) Roll the folded felt on itself, hot gluing as you roll to secure it in place.
4) Vary the width of your cuts to achieve different looks. The thinner your snips, the fuller the flower will be.
This post DIY Felt Flower Wreath for Fall appeared first on Bird's Party Blog


This is so cute. Those flowers are beautiful!
ReplyDeleteAbsolutely adorable! So simple yet so elegant!
ReplyDeleteYou're very talented; I could use some of your skill around my kitchen and house!
ReplyDeleteThese are really pretty! Perfect for my holiday decors!
ReplyDeleteSimple and easy wreath idea. Thanks for sharing.
ReplyDelete